Wednesday, July 30, 2014

Outfit Along: Myrna Sweater and New Look 6184

For the most part, I don't join sewalongs. But when I saw that Andi Satterlund and Lladybird were joining up for an Outfit Along, I was sold. The idea behind the challenge was to knit a sweater and a sew a dress. 


Andi Satterlund has a lot of sweater patterns designed to be worn with retro, high-waisted dresses. Sounds like me, right?

I didn't start working on this until almost a month in because my wedding happened right at the beginning of the challenge, but I still managed to finish it, helped largely by the fact that I now commute on the metro and get an hour for lunch every day. Lots of daily knitting time!


This sweater was  just as easy as promised. I managed to knit the entire thing in just over a month, despite the fact that I'm still a relatively new knitter and knit fairly slowly (well, I purl fairly slowly anyway -- a row of purling takes me twice the time a row of knitting takes!)

I made this with KnitPicks Comfy Worsted cotton yarn in Whisker. Isn't that the cutest color name? My poor old light grey J Crew sweater had just about died, so I was super pleased to find my perfect light grey yarn.


I bought buttons for this sweater at my local yarn store, Uniquities, but I have been unable to find matching petersham. I've also worn this sweater twice now and have not missed the buttons yet -- I almost never wear sweaters buttoned. Maybe I will just leave them off forever?


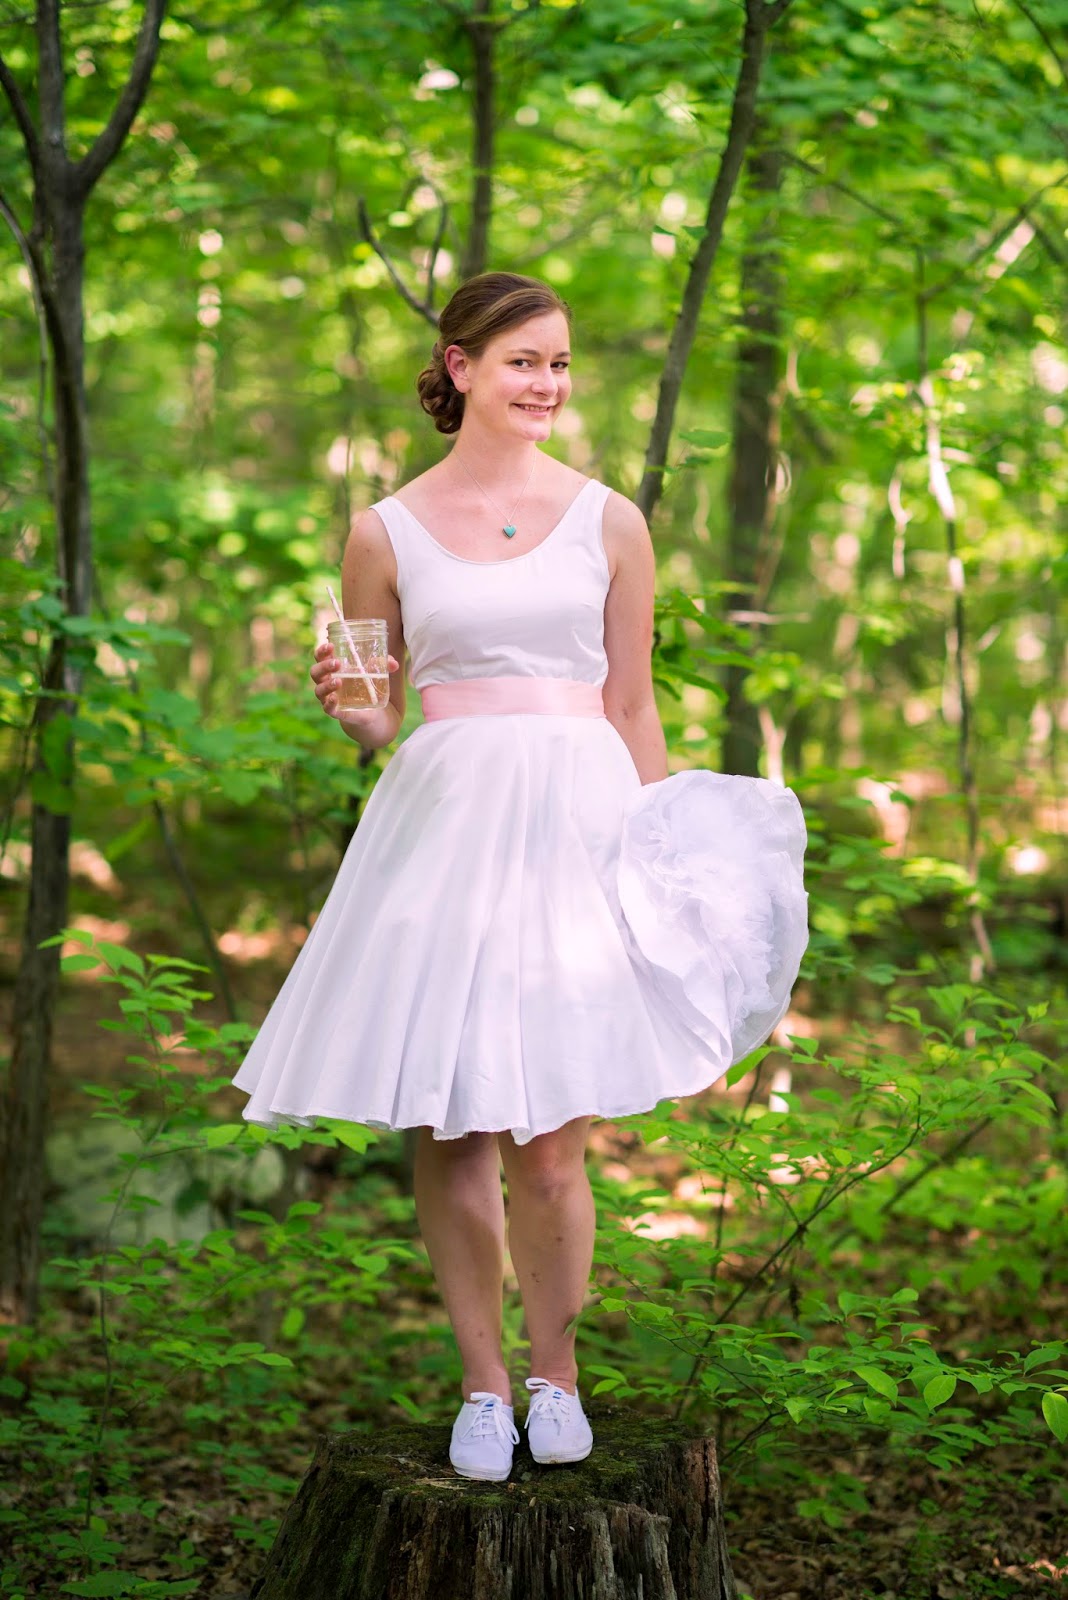
The back of the sweater has a cute keyhole detail; it gives a little peekaboo of my dress. Saucy!

I definitely made a few mistakes in this sweater (like not picking up enough stitches in the button band, which apparently means the band is a little small -- who'd have guessed?! -- which I suppose I should have known.) I fully admit I'm still learning. But I definitely think it will get a ton of wear.


The dress is New Look 6184. I adore this dress. It has a pleating detail at the neckline and the armscyes are nice and deep. No alterations there necessary! 


I cut an 8 at the bust and a 10 at the hip -- my standard New Look alteration.


The skirt is lovely -- it's a half circle cut in seven pieces, which was perfect for my 45-inch-wide fabric. The fabric is Michael Miller Madrona Road Wild Carrot in blue. It's a really soft and drapey quilting cotton fabric and I just adore the pattern. I didn't bother to match the pattern at all, but I did place carefully to make sure I didn't have any questionable yellow dots in inappropriate places on my bodice front.


Instead of lining, I went with facings, as directed (for once!)

This dress was super quick to sew up. I cut all the pieces, fused my interfacing, serged all edges and then sewed it up all in one night!


Greg's comment on this outfit was: "400% you!" which, in terms of compliments, is really the best I could ever want.


I feel so good in this outfit -- I may never take it off!

Sunday, July 27, 2014

The Great Reveal: Sewing My Own Wedding Dress and Giveaway Winner!

This week, Greg and I will have been married two months -- high time for a post about my wedding dress, am I right? 

All photos in this post were taken by our fantastic photographer Ian Sbalcio (I highly recommend him!)


I went through quite the trial leading up to sewing my wedding dress. I started out with some lovely silks from Mood and the By Hand London Anna bodice and a big skirt -- but that dress just wasn't working out. I wanted a big floofy skirt, and the fabric I used was so light it showed every bump in the crinoline. 

After a quick mental breakdown, I had a good night's sleep, regrouped, ordered new fabric and went with my backup plan: basic white sundress. 

The pattern I used it Butterick 5748, which I've made twice before.


The outer fabric is Robert Kaufman silk cotton sateen and the lining was just plain light cotton lining fabric. Both were ordered from Fabric.com about a month before the wedding -- and, in a moment of insanity, I only ordered four yards of each, which is about exactly what you need to make this dress. (The ribbon was a plain satin ribbon from the stash I used to decorate the wedding area.)


I didn't start the dress until two weeks before the wedding. I was pretty exhausted by that point (we had an at-home wedding at Greg's parents' house in Leesburg, Va., so there was a fair amount of work involved) and I was not super excited about sewing ANOTHER wedding dress. 

But I finally put on a movie a zoned out and got this mostly done in a day. 

But can you see my major error in the above photo?


Me neither -- but look at it again and you'll see it.

I am fairly sure I forgot to staystitch the neckline and the super light fabrics just streeeeeeeeeeetchhhed out. Really badly. And I didn't have enough fabric left over to make a second bodice. 

I mean, God bless the sewing community. I posted on Instagram for help and was immediately offered tons of advice and offers to go and look for lace to cover it up. It really calmed me down a lot. And then a lady on Pattern Review (I posted for help in the wedding/formal sewing forum) suggested I steam it into submission. I applied tons and tons of steam, but ultimately, didn't make enough difference. Finally, I just made a strip of bias binding, sewed it on, flipped it to the inside, stitched it down and called it a day.


Oh, and I also, in my panic, got a little makeup on the neckline. So I dry-cleaned it, which got the crud off the neckline, but also made it bubble and flip to the outside. I was pretty mad about the pressing job our dry-cleaner did(n't), actually, but I brought it home, pressed the hell out of it and it was fine.


I don't have much to say about the construction -- this is a super simple dress to put together. As with previous versions, I put the zipper in the center back, rather than the side (which the pattern tells you to do) because underarm zippers annoy me.


Because the fabrics were light, I used a microtex needle. I originally planned to hem by hand, but when I got to the end, I was ready to be done, so I just trued the hem and did a plain old narrow hem on my machine.


Underneath the dress, I wore a crinoline from Modcloth made from soft polyester and on top of that, I wore a House of Oliver cotton and lace petticoat, which maintained the smooth lines of the skirt. I definitely plan to wear the cotton petticoat again -- it doesn't provide much floof, so it's not too costumey and it was very comfortable.


The sewing moral of this story? Staystitch your necklines. 

The life moral of this story? Making my wedding dress was 100 percent worth it -- I'd never have gotten a dress like this in a store. No one noticed the wonky neckline. Or if they did, they didn't say anything. 

I had the absolute best day of my life, the exact wedding I wanted. I wore Keds to the reception and danced to a fantastic bluegrass band all night. And, best of all, I got to marry Greg. 


So all the pain was worth it! 

And, finally, here's our winner for the House of Mouse Caroline Dress from Indiesew

Congratulations to Erin Goh
It's such a pretty dress, especially the cute little sleeves and the high neckline.

Thanks, Erin! Send me an email and I'll pass it along to the folks at Indiesew for your pattern. Enjoy!


What do you think? Would you ever sew your own wedding dress?

Friday, July 18, 2014

House of Mouse Caroline Dress and a Giveaway from Indiesew!

Another work-appropriate dress? Yes, please!


This is the Caroline dress from Mouse House Creations, a new-to-me indie pattern designer. 

A few weeks ago, Steve from Indiesew, a new online retailer/community dedicated to indie patterns, contacted me and asked if I'd like to work with them. We decided to do a pattern review and giveaway, and they let me pick the pattern.

After carefully browsing the patterns to find one that I would actually be willing to buy -- I got this pattern free, but I wanted to choose something I'd buy for myself even if I weren't getting the pattern free -- so I chose the Caroline Dress for several reasons. The price is not outrageous; it includes several options for different looks; it fits my personal style. 


And also, I was intrigued by these cap sleeves.  Aren't they interesting? They're not set in as sleeves at all, but instead are created as part of the bodice. The seam is slightly curved so that they lie well on your shoulders.


The pattern comes with long-sleeve, short sleeve and cap sleeve (seen here) options. It also comes with four different length options: above the knee, at the knee, below the knee (seen here) and peplum. Finally, it has two different necklines. I made the high neckline, but there is also a scoop neckline, which I'll probably try out at some point.


The skirt doesn't actually have a pattern piece -- just dimensions -- but, there are instructions for making either a pleated skirt or a gathered skirt. I chose to do pleats. I used a very heavy fabric for this, and I didn't think gathering would work well. 


And you'll never guess what that side seam is hiding....


Pockets! My favorite!


The dress is fully lined, which is my preference for most dresses.


The lining is a lovely cotton batiste in a nice slate blue. The main fabric is a fantastic mystery fabric that I bought from Charlotte. She was destashing and once I saw this fabric, I had to have it. It is fairly thick linen-look cotton, but very soft. But I don't mind the thickness, because my office is FREEZING! 


The best thing about this dress, I thought, was the fit. This is a straight-from-the-paper fit -- the only tiny change I made, which I make to every single pattern ever, was grading from one size at the bust to the next size at the waist. Not bad fit-wise, eh?

Now, while there are lots of similar patterns on the market, the huge strength of this pattern is the amount of hand-holding in the instructions. It has color pictures of every step -- this would be a perfect pattern for beginners, and I'd highly recommend it if you're learning (or if you're like me and are addicted to new bodice options).


I'm definitely a fan.

But now, the fun part! Indiesew has agreed to give a digital copy of the Caroline Dress to one of my readers. Yay!

To enter, leave a comment here and I will randomize next Friday, July 25, for a winner. 

Good luck and happy sewing!

Tuesday, July 1, 2014

Things I've Sewn Lately: Navy Blue Circle Skirt (With Bonus Previously Unblogged Blouse!)

In my quest to make more work-appropriate separates, I realized fairly quickly that in addition to blouses, I definitely needed some plain, solid-colored bottoms. 


I bought this fabric, a very slightly stretchy twill, when cottons were on sale at Fabric.com recently. I don't have a large stash, and I definitely don't have very much in terms of bottomweight fabric. Or actually anything for that matter. I have lots of blouse fabric and dress fabric (though in terms of stashing, I don't have very much in general, by sewing blog standards!)

This material was right up my alley! Thin enough for summer, but thick enough to have some body. 


I used Mettler thread (purchased from Sun Sew Vac when I bought my new sewing machine!) This was my first time with Mettler thread, which everyone says is fantastic, but I didn't notice too much difference. The color of the thread was an absolute dead-on match though, so there's that.


 See?


I serged the insides with white thread. I don't stock any serger thread besides white or black unless I have a special project. But white and navy look nice together and the contrast seam finish adds a little something to the inside of the garment in this case, I think!


I used a black invisible zipper in the center back. One of my friends gave me a stash of black and red invisible zippers, and the navy is so dark you can't really tell that the zipper doesn't match, can you? 


In terms of pattern, I used the Cake Patterns Pavlova circle skirt pieces (why draft your own when you have a pattern that already did it for you?) and made my own waistband.

The last time I made the Pavlova skirt, I was unhappy with the waistband. This time, I slightly more than doubled the waistband and I cut it much larger than recommended. I don't know why, but for some reason, the 30-inch waist piece on my pattern in no way matches the skirt (the skirt is several inches wider at the top than the waistband is!) I don't know if I got a misprint or what.

The Pavlova top was perfect (I wore it yesterday!) but the skirt just didn't do it for me, so I doubled the height of the band and then added a few inches to get to 30 inches with seam allowance so that I could enclose the zipper at the top, a la Colette Ginger.


I wore this skirt to work today and I must say, it's very comfortable. I love a circle skirt for wearing ease! And in this outfit, I feel very Ulyana Sergeenko. 


In addition to the skirt, I should probably mention this blouse. It's a New Look 6808 that I made last year soon after I started sewing (and somehow I never blogged it!) The fabric is from G Street and they had only a yard, but I was in love, so a blouse it was!

I eliminated the back darts so that I could leave out the side zipper. Hilariously, the seams are all pinked and therefore beginning to unravel. Every time I wear this blouse, I swear I'm going to remake it before I wear it again, but I never seem to get there. One day!


Miss Celie wrote today about adjusting to "work appropriate" in her new job and her post rang so true to me. I have worked in D.C. for the past several years, but my new job seems much fancier in terms of dress than my old job. Both had the same stated dress code for the most part, but everyone at my new job always looks very corporate. (Not to mention the fact that I spent the entirety of last year working from home in my leggings!)

It probably doesn't help that all I see on the Metro and on my walks into the office are pencil skirts and silk tops and I just don't have much of that. I'm just not a pencil skirt kind of girl. So I've been struggling to define "work appropriate" in terms of my personal style and comfort.

It's a process!

How to you handle the intersection of home-sewn and work-appropriate? I'd love to know what you think!